ماکت رآکتور دی تیون

راکتور دی تیون
راکتور دی تیون
راکتور دی تیون
راکتور دی تیون
راکتور دی تیون
متریال

پلکسی گلس و آلومینیوم

مقیاس

1/32

کارفرما

دسته بندی

ماکت صنعتی

ساخت این ماکت “رآکتور دی‌تیون” (D‑Tune Reactor) با استفاده از متریال پلکسی‌گلاس و آلومینیوم شامل چند مرحله اصلی است:

۱. طراحی و برش قطعات

  1. طراحی سه‌بعدی
    • ابتدا کل پرسپکتیو رآکتور در نرم‌افزار CAD (مثل SolidWorks یا Fusion 360) مدل می‌شود.

    • ابعاد بیرونی بدنه‌ی هر کویل (قرمز) و چارچوب آلومینیومی (آبی) تعیین می‌شود.

  1. برش پلکسی‌گلاس برای کویل‌ها
    • شکل نیم‌استوانه‌های قرمز (بخش‌های عایق کویل) روی ورق‌های پلکسی‌گلاس مخملی یا مات علامت‌گذاری می‌شود.

    • با دستگاه CNC یا لیزرکات برش زده می‌شود.

    • در صورت نیاز برای منحنی‌یابی دقیق، از فرم‌ورک‌های چوبی موقت استفاده می‌شود.

  2. برش آلومینیوم برای فریم
    • پروفیل‌های آلومینیومی (قالب‌های بالا و پایین و ستون‌ها) با ارّه آلومینیوم‌بُر یا فرز CNC برش می‌خورند.

    • شیارها و نقاط اتصال (برای پیچ و پرچ) طبق نقشه تعبیه می‌شوند.

۲. مونتاژ بدنه کویل‌ها

  1. خم‌کاری و چسب‌کاری پلکسی
    • هر نیم‌استوانه پلکسی با خم‌کاری حرارتی (هیتر) یا با اتصال لبه‌ها با چسب مخصوص پلکسی (متاکریلات) به یک استوانه کامل تبدیل می‌شود.

    • محل درزها با سنباده نرم صاف می‌شود.

  1. هم‌مرکزی کردن استوانه‌ها
    • یک لوله‌ی مرکزی (هسته‌ی کویل) از جنس آلومینیوم یا PVC درون استوانه‌ها قرار می‌گیرد تا شکل پایدار شود.

    • با فاصله‌دهنده‌های داخلی (واشرهای آلومینیومی یا فواصل پلکسی) فاصله‌ی مناسب بین هسته و بدنه حفظ می‌شود.

۳. ساخت چارچوب آلومینیومی

  1. مونتاژ پروفیل‌ها

    • شاسی پایینی و بالایی از پروفیل‌های آلومینیوم ساخته و با پیچ و مهره (یا پرچ آلومینیومی) به هم متصل می‌شوند.

    • ستون‌های میانی بین شاسی بالا و پایین نصب می‌شوند تا استحکام چارچوب تأمین شود.

  2. رنگ‌آمیزی و پرداخت

    • سطح آلومینیوم با سنباده ریز پرداخت می‌شود و سپس با پرایمر و رنگ کوره‌ای آبی پوشش داده می‌شود.

۴. نصب کویل‌ها و جزئیات نهایی

  1. نصب کویل‌ها

    • استوانه‌های قرمز روی شاسی با پایه‌های آلومینیومی و واشرها فیکس می‌شوند.

    • محل اتصال‌ها (چهارگوش‌ها) با پیچ و مهره‌های استیل به فریم بسته می‌شود.

  2. قرقره‌ها و تکیه‌گاه‌ها

    • محورهای پایین (چرخ مانند) که برای جابه‌جایی ماکت تعبیه شده‌اند، روی شاسی پایینی سوار می‌شوند.

    • جزئیات کوچک مثل بست‌های قرقره (سیم‌های ضربدری) با نخ کتانی یا سیم پلاستیکی قرمز شبیه‌سازی می‌شود.

  3. نوارها و رنگ‌کاری تکمیلی

    • لوگوی شرکت (SIAGE) و برچسب‌ها روی ورق مشکی پایه چسبانده شده.

    • تمام قطعات با دمنده هوا تمیز شده تا گرد و غبار نماند.

راکتور دی تیون
راکتور دی تیون

Model of the Squash Hall Section at Enqelab Sports Complex

  • Materials: Plexiglass and Aluminum
  • Scale: 1:32
  • Client:
  • Category: Industrial Model

The construction of this model of the “D‑Tune Reactor” using plexiglass and aluminum involved several main stages:

  1. Design and Cutting of Components

3D Design
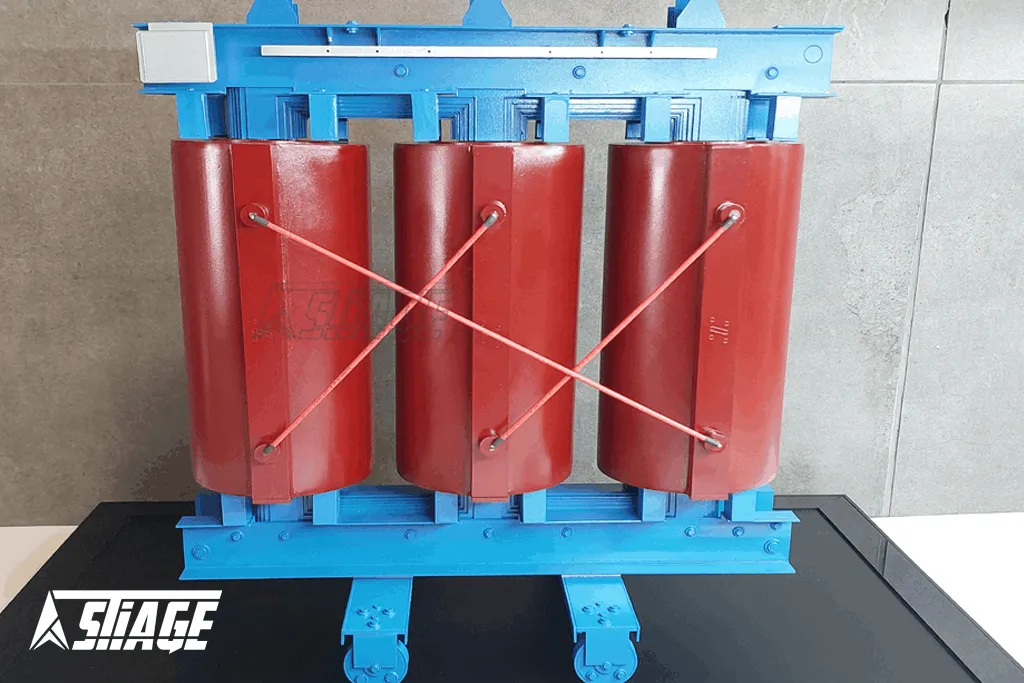
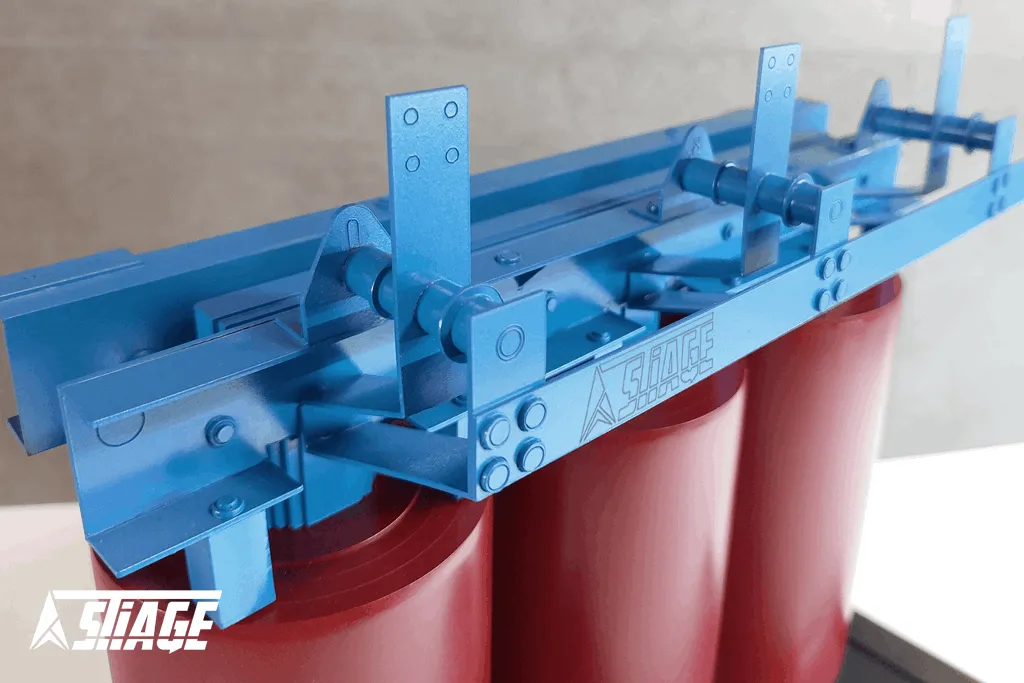
The full perspective of the reactor is first modeled in CAD software such as SolidWorks or Fusion 360.

The outer dimensions of each coil body (red) and the aluminum frame (blue) are defined.

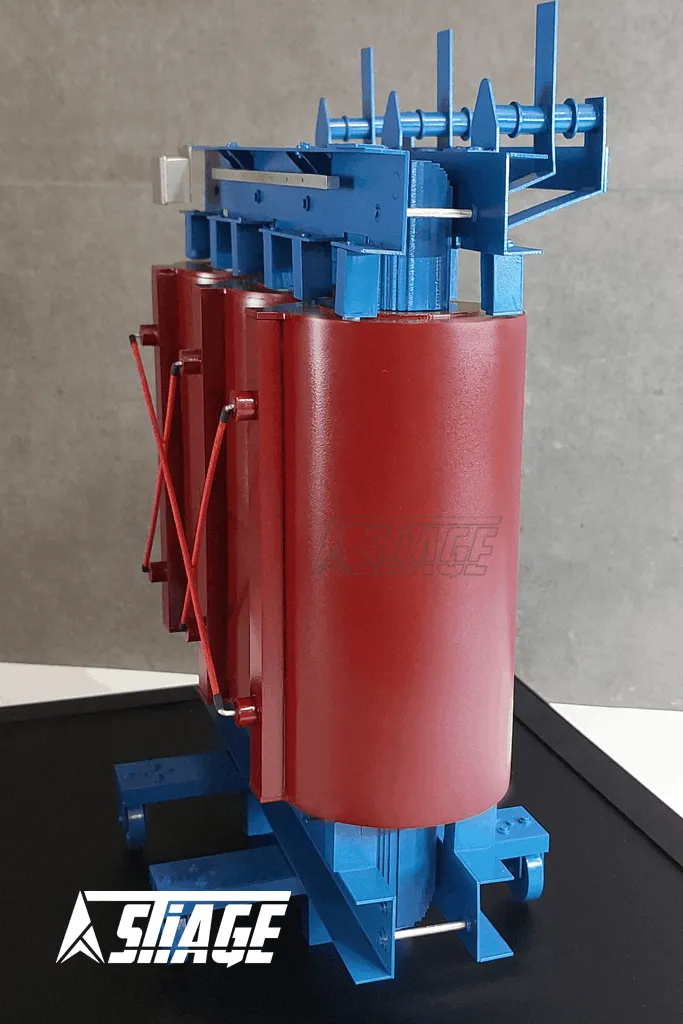
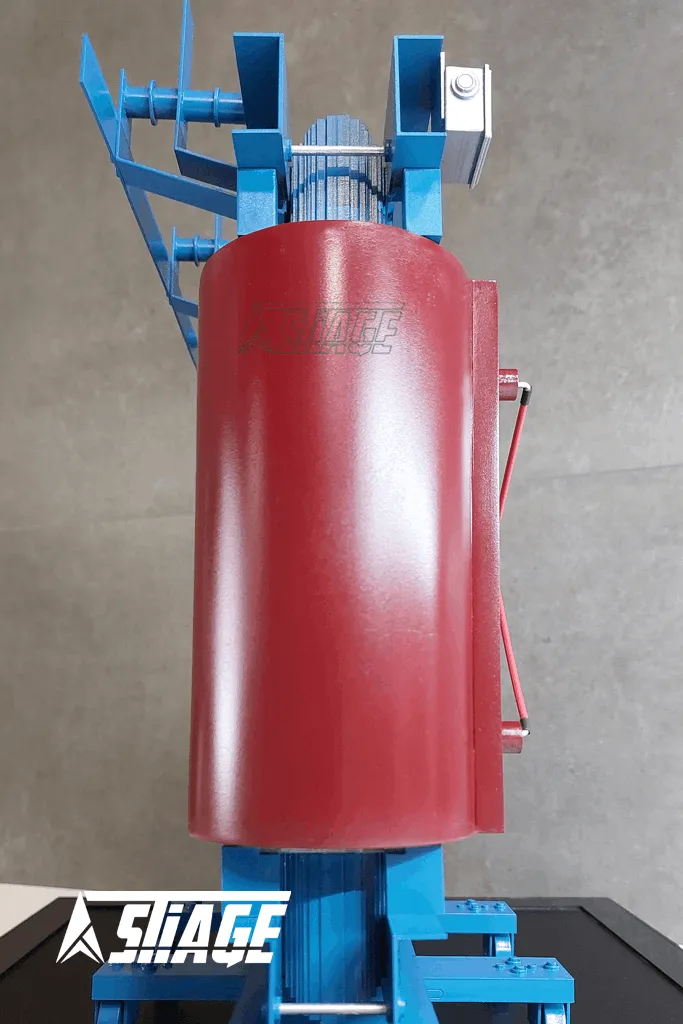
Cutting Plexiglass for the Coils
The red semi-cylindrical shapes (insulating parts of the coils) are marked on velvet or matte plexiglass sheets.

They are cut using CNC or laser-cut machines.

If precise curving is needed, temporary wooden frameworks are used for shaping.

Cutting Aluminum for the Frame
Aluminum profiles (top/bottom molds and columns) are cut using an aluminum saw or CNC milling machine.

Grooves and connection points (for bolts and rivets) are made according to the design plan.

  1. Assembly of Coil Bodies

Bending and Gluing Plexiglass
Each semi-cylinder of plexiglass is turned into a complete cylinder using heat bending or by gluing the edges with plexiglass adhesive (methyl methacrylate).

Seams are smoothed with fine sandpaper.

Centering the Cylinders
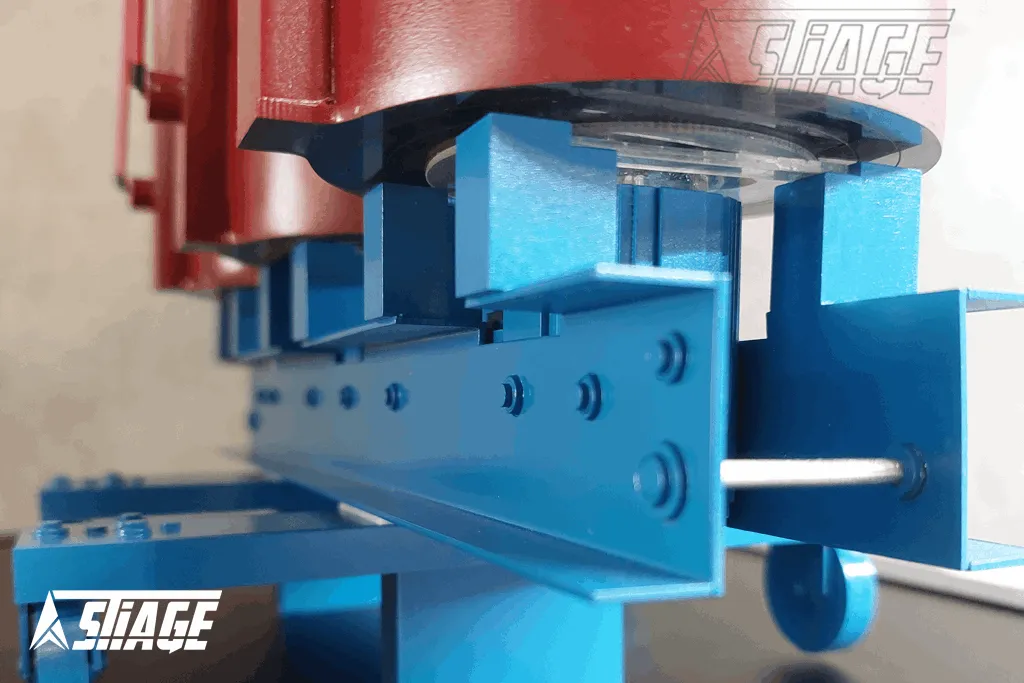
A central pipe (coil core) made of aluminum or PVC is inserted inside the cylinders to stabilize the shape.

Internal spacers (aluminum washers or plexiglass rings) are used to maintain proper distance between the core and the outer body.

  1. Construction of the Aluminum Frame

Assembly of Profiles
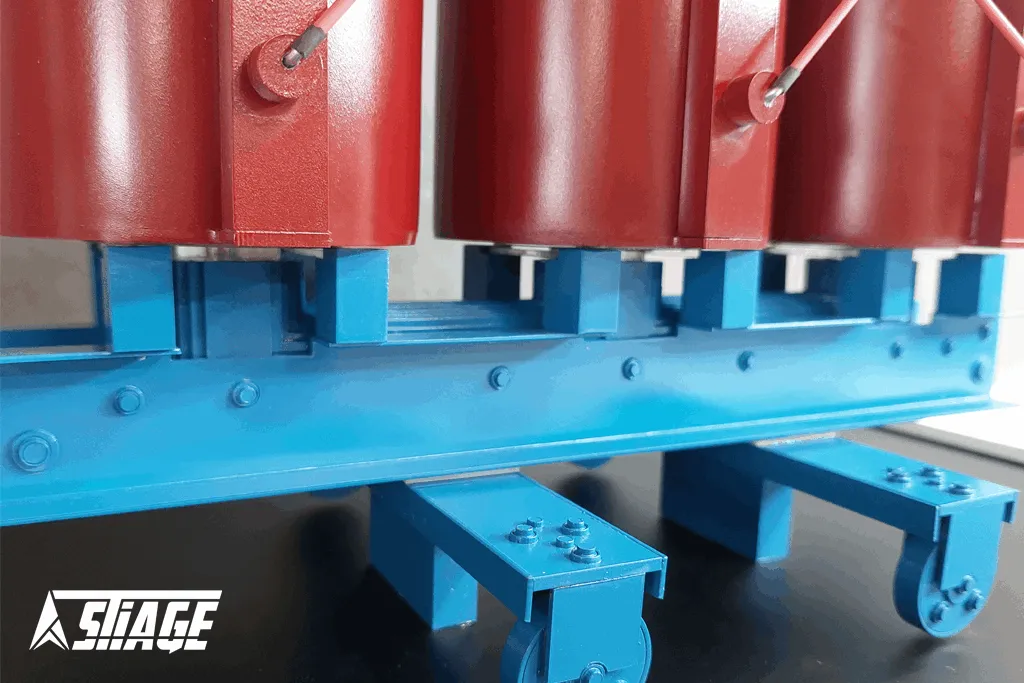
The upper and lower chassis are constructed from aluminum profiles and joined using bolts or aluminum rivets.

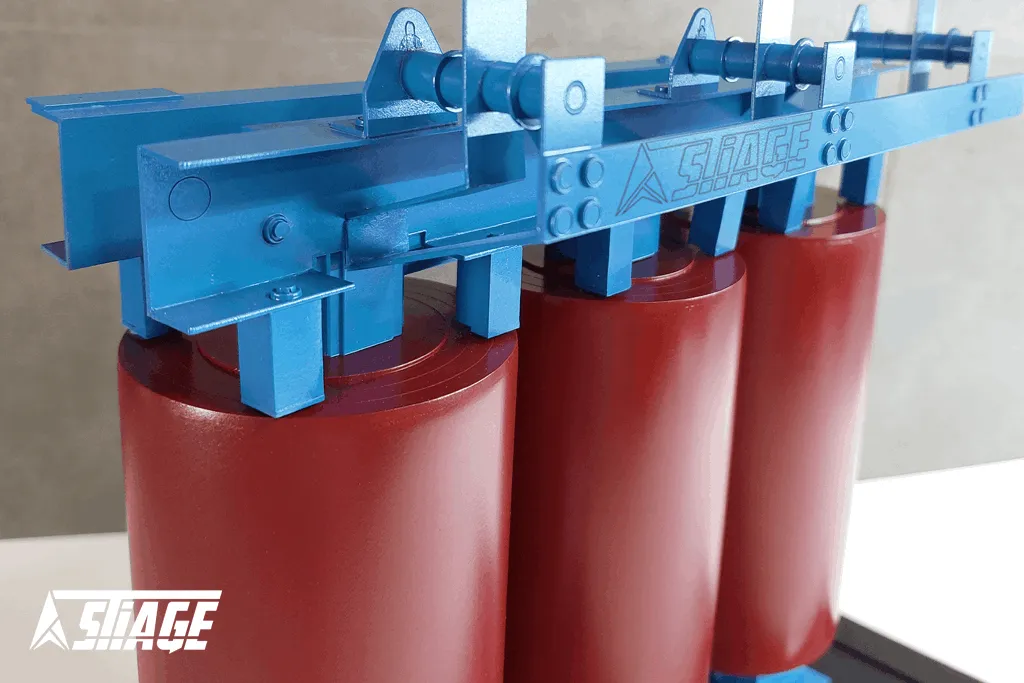
Middle columns are installed between the top and bottom chassis to ensure frame stability.

Painting and Finishing
The aluminum surface is polished with fine sandpaper, then coated with primer and finished with a blue baked enamel paint.

  1. Installation of Coils and Final Details

Mounting the Coils
The red cylinders are fixed onto the chassis using aluminum bases and washers.

The square connection areas are secured to the frame with stainless steel bolts.

Pulleys and Supports
Lower axles (wheel-like structures) designed for moving the model are installed on the bottom chassis.

Small details such as pulley brackets (crossed wires) are simulated using cotton thread or red plastic wire.

Labels and Final Touches
The company logo (SIAGE) and labels are placed on a black base sheet.

All components are cleaned with an air blower to remove dust before final presentation.