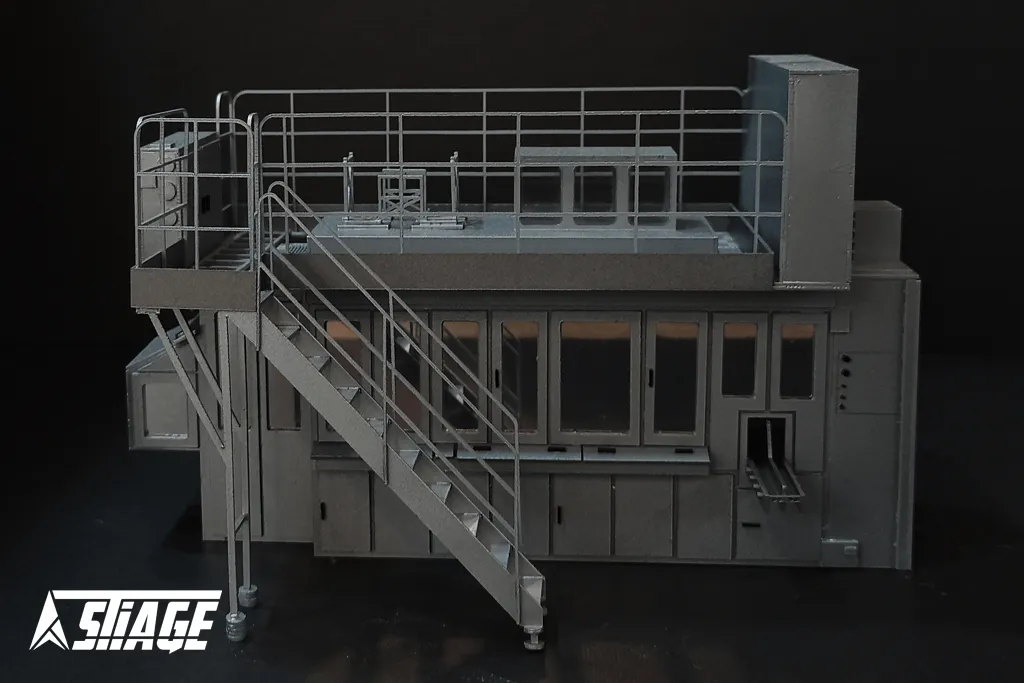
فرآیند طراحی و ساخت ماکت دستگاه تتراپک در مقیاس ۱:۱۰۰
ماکت دستگاه تتراپک، بازنمایی دقیقی از یک ماشین صنعتی پیشرفته در مقیاس ۱:۱۰۰ است. این نوع ماکتها عمدتاً برای اهداف آموزشی، نمایشی یا بازاریابی در شرکتهای تولیدی مورد استفاده قرار میگیرند. در این پروژه، تمرکز بر نمایش ظاهری و مکانیکی دستگاه با استفاده از متریالهای صنعتی و تکنیکهای رنگآمیزی دقیق بود. در ادامه، مراحل طراحی و ساخت این ماکت بهصورت کامل شرح داده شده است.
۱. تحلیل و بازطراحی نقشهها
در ابتدای فرآیند، نقشههای فنی، تصاویر سهبعدی و دادههای مهندسی دستگاه تتراپک بررسی شد. ابعاد واقعی به مقیاس ۱:۱۰۰ تبدیل شدند و مدل سهبعدی دیجیتالی بهصورت دقیق بازسازی گردید تا برای برش و مونتاژ آماده باشد.
۲. انتخاب متریال
با توجه به ساختار فلزی و صنعتی دستگاه، ترکیبی از پلکسیگلس شفاف و رنگی و آلومینیوم سبک انتخاب شد. پلکسی برای سطوح نیمهشفاف، پوششها و بدنهی خارجی استفاده گردید، در حالی که آلومینیوم برای قطعات فنی، پایهها و بخشهایی که نیاز به حس صنعتی و سختی بیشتر داشت بهکار رفت.
۳. آمادهسازی قطعات
بر اساس نقشههای برش، تمامی اجزا توسط دستگاه لیزر (برای پلکسی) و CNC (برای آلومینیوم) آماده شدند. در این مرحله، دقت در ابعاد برش و تطابق قطعات کلیدی بود تا مونتاژ نهایی بهدرستی انجام شود.
۴. مونتاژ با دقت بالا
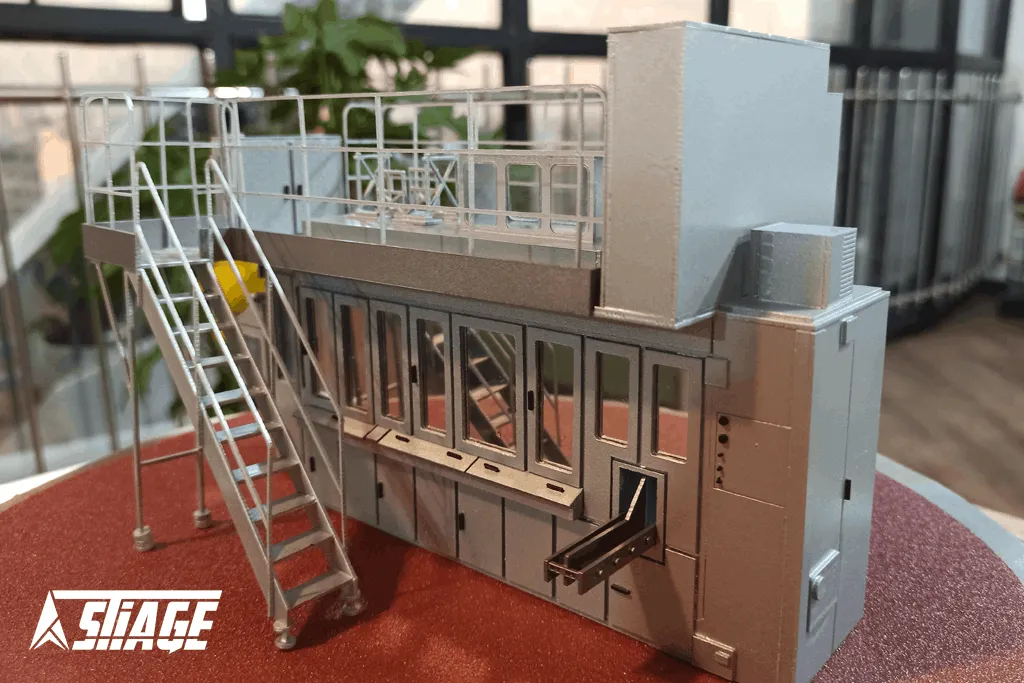
قطعات پس از برش، با استفاده از چسبهای صنعتی مخصوص پلکسی و آلومینیوم و بستهای ریز مونتاژ شدند. ترتیب و تراز دقیق قطعات، باعث حفظ نسبتهای صحیح و نمای واقعی دستگاه گردید.
۵. رنگآمیزی واقعگرایانه
رنگآمیزی با استفاده از رنگ خودرو در چند لایه انجام شد تا هم دوام بالا داشته باشد و هم سطح صاف و براق دستگاه واقعی را شبیهسازی کند. همچنین با استفاده از تکنیکهای بافتدهی و رنگهای جانبی، بخشهایی از دستگاه که در واقعیت دارای بافت یا خطوط صنعتی خاص هستند نیز بازآفرینی شدند.
۶. آمادهسازی نهایی و ارائه
در پایان، ماکت روی یک پایه مناسب نصب شد. همه اتصالات الکتریکی (در صورت نیاز به نورپردازی یا حرکت) پنهان شدند و ماکت برای نمایش در نمایشگاهها یا دفاتر شرکت آماده گردید.
این ماکت با توجه به دقت ساخت و واقعگرایی در رنگآمیزی، میتواند بهعنوان ابزاری حرفهای برای نمایش ساختار و عملکرد دستگاه تتراپک در ابعاد کوچکتر مورد استفاده قرار گیرد.
Tetra Pak Machine Model
Scale: 1:100
Client: –
Materials: Plexiglass and Aluminum
Painting: Automotive Paint
Painting Style: Realistic with Material Texture
Category: Industrial Model
Design and Construction Process of the Tetra Pak Machine Model at 1:100 Scale
The Tetra Pak machine model is a precise representation of an advanced industrial machine at a 1:100 scale. These types of models are mainly used for educational, display, or marketing purposes in manufacturing companies. This project focused on showcasing the external appearance and mechanical structure of the machine using industrial materials and detailed painting techniques. Below is a complete explanation of the design and construction stages:
Analysis and Redesign of the Drawings At the beginning of the process, technical drawings, 3D renderings, and engineering data of the Tetra Pak machine were reviewed. The real dimensions were scaled down to 1:100, and a digital 3D model was accurately reconstructed to prepare it for cutting and assembly.
Material Selection Considering the machine’s metallic and industrial structure, a combination of transparent/colored plexiglass and lightweight aluminum was chosen. Plexiglass was used for semi-transparent surfaces, covers, and outer body parts, while aluminum was employed for technical components, supports, and areas requiring a tougher, more industrial feel.
Component Preparation Based on the cutting plans, all parts were prepared using a laser cutter (for plexiglass) and CNC machine (for aluminum). Precision in the cutting dimensions and compatibility of key components was crucial to ensure accurate final assembly.
High-Precision Assembly After cutting, the parts were assembled using industrial adhesives for plexiglass and aluminum, as well as small fasteners. Proper alignment and positioning of the components preserved the accurate proportions and realistic appearance of the machine.
Realistic Painting Painting was done using automotive paint in multiple layers to ensure durability and replicate the smooth, glossy surface of the actual machine. Additionally, using texture techniques and accent paints, specific areas of the machine with real-world textures or industrial line patterns were recreated.
Final Preparation and Presentation In the final step, the model was mounted on a suitable base. All electrical wiring (if lighting or movement was needed) was hidden, and the model was prepared for display at exhibitions or company offices.
Thanks to its construction precision and realistic painting, this model serves as a professional tool for presenting the structure and function of the Tetra Pak machine on a smaller scale.


")

